Wednesday, November 22, 2017

Thanksgiving Tablecloth


This is one of my favorite family traditions. One year for an early Christmas present, I bought my mom this boring tablecloth. Just a bland muslin type material. We didn't have a lot of money and I was trying to be creative. I must've seen the idea in a magazine (this was a dozen years or so ago before Pinterest). What she was supposed to do, was to put it out on Thanksgiving before the feast, and while the food is finishing up, everyone was supposed to write what they are thankful for. It seemed a bit silly at first, but as the years have gone on, it has become such a family treasure.
The same table cloth comes out every year, and it's fun to see how much the kids have grown up. My daughter was only 5 years old when she drew this picture. She's now 16, and it's crazy to see how time flies.
 You can see who was the most impatient for dinner...not much has changed over the years... (ha ha!!)
 And you can remember your friends or family that have now passed on. A little piece of them is saved  to be with you year by year. This is the most special part for me.
 Wonderful memories with family and friends.
Grab some fabric markers. My mom always puts a marker proof cloth underneath, and then covers it with vinyl during the meal.
If you see me at the store in a few minutes, it's because I'm long overdue starting this tradition at my own house, and I'm buying my own table cloth! Happy Thanksgiving!!

Cranberry Orange Muffins

This is a great way to use up any extra cranberry orange sauce you may have left over. Maybe make a double batch of sauce, just so you can make these wonderful muffins...

Hillary's Cranberry Orange Muffins
1/2 cup milk
1/2 cup buttermilk
1/4 cup vegetable oil
1/2 tsp vanilla
1 large egg
2 cups all purpose flour
1/3 cup sugar
1 TBSP baking powder
1/2 tsp salt
1 cup cranberry orange sauce (click to go to our recipe)

(*if you don't have any buttermilk on hand, you can substitute with regular milk and 1 tsp of lemon juice)

Streusel Topping (optional)
2 TBSP cold butter
1/4 cup flour
1/4 cup brown sugar
4 dashes of cinnamon

Cut butter into other ingredients until you have little pea sized bits of butter.


1. Preheat your oven to 400 degrees. Grease 12 muffin cups. (I use cooking spray)

2. Mix up your streusel topping. Push it off to the side for later.

3. Get your mixer and beat the wet ingredients: milk, oil, vanilla, and egg. Stir in dry ingredients and cranberry orange sauce. Just until combined, you don't want to over mix.

4. Pour into muffin tins. Spoon about a tablespoon of streusel topping onto each.

5. Bake around 20 minutes, until golden on top and toothpick comes out clean.

6. Loosen up muffins, pull out of the tins and cool on a rack.


Tuesday, November 21, 2017

Sweet Potatoes- and some Marshmallow Mischief

So we've covered green beans and cranberry sauce, now we get to talk about sweet potatoes. I love sweet potatoes!! I've always enjoyed them, but it wasn't until my Uncle Todd made sweet potatoes with pumpkin pie spices when I was a teenager, that they became my favorite side at Thanksgiving. Here is my version:
2 large sweet potatoes (yams- whatever- the orange ones)
1/4 cup butter
1/4 cup brown sugar
1/2 tsp cinnamon
2 dashes grown nutmeg
1 dash ground ginger
1 dash ground cloves
1/4 tsp salt
(splash of vanilla- optional)
(mini marshmallows- optional- but so yummy!!)

If you don't have all these individual spices- use about a teaspoon of pumpkin pie spice.
Peel and slice the sweet potatoes. Put in a pot and cover with water. Bring to a boil for 20-25 minutes. They are done when they are very tender when poked with a fork.
(Look at all these colors together- isn't cooking exciting!! Okay, back to our sweet potatoes.)

Drain the water and add the other ingredients. Get out your hand mixer and whip it all together. Now don't go too crazy with the mixing. Just until the major lumps are out is just fine. We don't want it getting soupy from the starch.
You can serve them as is, or you can put a layer of mini marshmallows on top (my preferred method), and toast in the oven at 425 degrees. Keep an eye on them until they are golden brown on top. 
It doesn't take long.
As I was taking pictures of the food for this post, my 2 youngest were jumping right in the mix. It was post naps, and the bed head and sweaty faces were in full force. I had them playing with oranges while I tried to sneak in a couple more shots. 

As you know, I take all my pictures on my porch (and was again, back in my pajamas- it was nap time!!), and the baby kept tossing the oranges down my driveway. My daughter would scream and worry about the oranges, so I had to go running quickly to rescue the entertainment in between photo shoots. Well, the baby must've had this planned from the beginning, because as soon as I was out of the way, he crawled over at super speed and dug his little fist smack into my bowl of sweet potatoes. Sticky marshmallows all over his hands.
When I tried to pull him away, he put both hands in my hair  (which of course had just been washed that morning). Such a sticky mess!
But who could be mad at that little face?? I just had to laugh out loud as they both started in on the green beans next. They were thoroughly enjoying themselves.
Maybe I should start a series on how to get your kids to eat their vegetables?? 
A little reverse psychology goes a long way, apparently.

Cranberry Orange Sauce

Cranberry sauce seems to be the type of side that is a love or a hate for most people. I was never very into it, until I had cranberry sauce made from scratch. Out of a can, it just didn't do it for me.  Now I am a huge fan. But as good as it is fresh, I thought it needed a little twist.

When we lived in California, my father in law had this amazing orange tree. He guarded those prized oranges like a fierce doberman.  And that is really saying something, because I don't think he has a mean bone in his whole body. But pick one of his gorgeous oranges, and watch out!! I know he was known to chase some unsuspecting kids down the street who had disturbed his crop.
I'm not sure if he sang to that tree every night before bed, or if he whispered loving words to it during the day, but whatever he did, that tree made the sweetest most gigantic oranges I've ever eaten. They always seemed to peak at Christmastime, and he would very generously bestow some of  his precious bounty upon us. They were truly divine.
So one year, I decided to use his oranges in my cranberry sauce. I added some orange juice to the cranberry sauce in place of water. Oh, what a difference!! It was not only delicious, but the prettiest thing on the table!!
We no longer live in California, and my dear, sweet father in law is fighting a losing battle with Alzheimers, and is no longer able to tend his beautiful orange tree, or the rest of his remarkable garden. Just remembering how he used to be, and the kindness he always showed to me brings tears to my eyes. But I'm thankful that this time of year will always remind me of him, and the sweet gift he is in our lives. There was a short time before his illness, after we moved away from California, that he would still mail us oranges- all the way to Texas. I'm sure it was a huge expense- those juicy things were heavy! He also would make sure to put some pomegranates in the box as well. Sometimes from his own tree, and sometimes ones he would barter and trade with his other gardening friends. The things I miss most about living in California are the people and the produce. We made such wonderful friends there. And the strawberry stands- don't get me started!!
 Well, enough of my reminiscing, onto our recipe!! The ingredients are very simple. 

3 cups fresh cranberries 
(frozen are fine, too. I often stock up on cranberries this time of year and toss them in my freezer. You don't even have to thaw them first, just toss in the pot)
1 cup sugar
1/2 cup water
1/2 cup orange juice
1/2 TBSP orange zest
1 cinnamon stick (I break it in half to make it fit in the pot easier)

Put water and sugar into a saucepan and bring to a boil. Add cranberries and cinnamon stick. Bring it back to a boil for just a minute, then put it back to low so the berries won't burst. 
Add orange juice and zest. Simmer for 10 minutes. Take off heat and chill in the refrigerator.
One of the great things about cranberry sauce, is that it is basically a jam- so you can make it way ahead of time. I've found that I enjoy it even more on ham than I do on turkey. It's also amazing on a pork roast cooked in a slow cooker. 
And if you have leftover cranberry sauce (which it seems like we always do), you can use it in muffin recipes in place of blueberries. I love cranberry orange muffins. 
I'll have to get a post together for you with my recipe.
So if you think you're a cranberry sauce hater- maybe give it one more try???

Monday, November 20, 2017

How to NOT make caramel apples!! Whoops!!

 My candy thermometer shattered, so we picked up the only thing we could find at Walmart- a meat thermometer. I'm not sure if it was the fact that it was a meat thermometer, or maybe a faulty device, but our caramel was definitely not heated up to temperature! Our friends thought they were going to be getting a great demo on how to make the caramel apples I posted last week. (Click here for that post and recipe.) It turns out they got a lesson on how not to make them instead. Whoops!!
 Luckily, the taste was still amazing, and even though we kept trying to rescue the sloppy golden deliciousness back onto the slippery apples, we finally gave in and just piled the toppings over the whole sheet.
The chocolate kind of held the candy in place... ha ha ha!!
But does it really matter if things turn out Pinterest perfect? Not when you have forgiving company, and a great time creating!!
So thank you friends, for learning along side us, and loving us despite our disasters!! 
These smiles here make the effort all worth it.

Friday, November 17, 2017

Garlic Green Beans

This is my favorite way eat green beans. It's been a family Thanksgiving favorite for years. I know a lot of people serve green bean casserole, but I love having a side that is light and fresh to balance out the other heavy food. This recipe is also a great option for family or friends that have allergies as it is gluten and dairy free.
The ingredients are simple: green beans, olive oil, garlic, salt and pepper. If I'm feeling fancy, I'll add bacon or parmesan cheese. But I think it stands on its own with out those options. (Definitely leave out the parmesan cheese if you have your dairy free crowd at the table!)

Toss your green beans in a pan with some minced garlic and a splash of olive oil at medium high heat. Saute for just a couple minutes. Then add a few table spoons of water, and cover with a lid for about 5-8 minutes. I know when the beans are done when they are a nice bright green color, I don't rely on exact cooking times. You can test the green beans with a fork to see if they are the tender texture you are looking for. Salt and pepper to taste. 
Sometimes if I'm in a pinch, I'll use garlic salt in place of the salt and minced garlic. 

This is one veggie our kids can always get on board with.

Thursday, November 16, 2017

How to sew a blanket


Making blankets is a great beginner sewing project. They usually only take about an hour to sew, and the lines are all straight. My kids LOVE soft snugly blankets, and I'm a sucker for a cute bright print. Giving blankets as baby gifts to new mothers, or maybe to a friend who is ill, is one of my favorite homemade presents to work on. The whole time I'm sewing them, I am thinking of the recipient, and it makes me happy. It's also a great excuse to turn on "Pride and Prejudice". I love having it on in the background while I work.

For baby blankets, I use one yard of two different types of fabric. For my big kids, I use two yards, and for my tall husband, I use 3 yards for each fabric. Other than the fabric, you just need a sewing machine, fabric scissors, pins, and thread.(And possibly a seam ripper, if you're prone to mistakes, like me.) 
It's best to iron your fabric first so everything lays flat. Some people like to also wash their fabric first, but I don't usually take that extra step.
When I start sewing, I don't start on a corner. I start in a little ways, so it's easier to fold in and sew over the open gap in the next step.
My kids all love putting the pins in the pin cushion for me, and love to use the back stitch lever. 


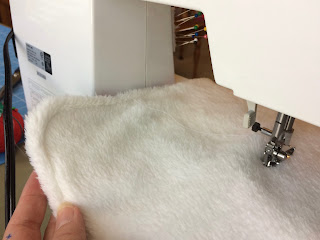
I like to do the shaggy fabric face up. Sometimes it gets caught in my sewing machine if I am going  too fast.

I push my fingers in the corners to make sure their edges are crisp. Sometimes I use a pen, or end of my scissors to push them out, if the fabric is too tight.
If your gap is large, you may want to pin this. 
You're almost done! 

If you don't want to go around again, you can sew a little X in the middle of the blanket, and that will keep the fabric from shifting in the wash as well.

Now go snuggle someone in your new cozy blanket!!

Tuesday, November 14, 2017

Caramel Apples

Caramel apples are one of my favorite treats. Even though they are covered in sugar and chocolate, there's something about having fruit at the heart of a dessert that helps me feel less guilty about eating it- most of the time.

My favorite caramel recipe comes from a pin I found on Pinterest. My daughter had one in her lunch yesterday as a treat, and was telling her friends about the family tradition we have of making them yearly. I never even thought of making caramel apples as a family tradition! It made me realize our lives are probably rich with things that we do that are viewed as traditions to our families. I just thought I was having a fall craving!


Here is that lovely caramel from the recipe link above. You can also unwrap and melt already made caramels from the store, but my kids love making the caramel from scratch. It's rich and buttery, and makes the house smell amazing. Granny Smith apples are my favorite to use because their tart nature keeps the sweetness from over powering your palate.
 We usually use wooden craft sticks to dip the apples, but of course, we were all out just as I was going to go about dipping the apples. So we got creative with some plastic knives instead. They weren't as sturdy, but they did the trick.
 Roll the apples in the caramel and let the excess drip off. We've found the toppings stay on better after the caramel has cooled on the apples for a bit. So once we had the apples covered in caramel we went about melting our chocolate.
Using a double boiler on the stove would be ideal, but with 7 kids running around the house, I don't have the patience for it. I use the microwave. I melt in 30 second increments, stirring in between so I don't burn the chocolate. Then use a spoon or fork to drizzle it over your apples.
We've used lots of different toppings through the years: white chocolate, dark chocolate, milk chocolate, Health, Snickers, Reeses, pretzels, M&Ms, nuts, coconut, cinnamon sugar, are just a few off the top of my head.
This is especially fun when we have friends over and everyone can make their own to take home. (For a behind the scenes on our apple making fail with friends- click here!! ha ha!!) 

These apples aren't perfect (my assistant chefs are kids), but the taste is all that matters anyway!!
And just to keep it a little more real, here's what it looks like behind the scenes during my food photography sessions.
 My 3 year old, bless her heart, just cannot keep that determined baby off my props.
And yes, I would be the crazy lady hopping, and crouching around a plate of food on the front porch in my pajamas.